This order will be a bit different, which is why I am featuring it here. How does an idea get from the drawing board to the Letterpress, to the Client? This is the first installment of what will be a two part blog entry.
Well, it all starts with brainstorming with the client, in this case Hannah and Colin, the couple-to-be. Hannah liked the fern examples she had seen on line and showed me a few screen shots. As soon as we came up with a general lay-out, I went to my favourite design 'go - tos': pencil, india ink and Bristol Board. The fern is to be a fairly whimsical design, not really detailed, largely a loose pen and ink design.
I penciled out the rough on the Bristol board with a No. 2 soft, using a kneaded eraser for corrections. Not a lot of corrections were required for a simple design.
I like to use Bristol Board for two reasons: Easy to erase on, and the surface is very friendly to ink. The pens used are Pentel's Technica Hybrid, which is a permanent inking ball point that comes in various sizes. Its not a Rapidograph, but then neither does it have a molecule thin venturi to plug.
The Hybrid did a great job. Lots of contrast, which makes a great image to scan for vectorizing. Just about done with the inking..
Here we go. Finished and ready to scan and vectorize. The only thing needed is to make sure a space remains for the text! So I ruled out lines where the text would eventually be placed.
I suggested a little bit of ornamentation at the end of the text. Not certain exactly what sort or ornamentation, so I left a little filigree swirl to remind myself to add a line of ornamentation. I think I will use a pair of Fleuron border pieces.
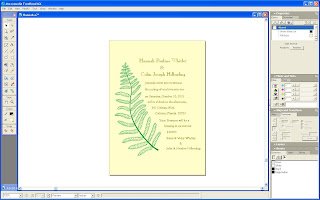
Here's a screen shot of the announcement. Paper is Ecru. The fern will be green, the text will be dark brown. Founts used will be 18 pt Caslon Open Face, with 12 pt Caslon Old Style No. 337, and O.S 12 pt 337 Italic. This will not be a digitally created set of dies, this order will use one die for the fern, probably one die for the RSVP, and all the rest will be handset.
This is the second "grouping" while still in the "stick". The composing stick is set to 21 picas, to leave me room to position each line of type around the curve of the fern. This might be a bit tricky because ordinarily type is justified in the stick, either right, left, or center justified. In this case we have a combination of justification requirements. I start off with the header being center and left justified. As the curve of the fern design swings around the lower portion of the card, the text will be left justified to follow that curve, yet produce a somewhat center justified tail piece that 'makes sense' with the overall design.
Twenty-one pica line length provided enough room to properly shift the type line per line, with a minimum of splitting quads. The Fern should fit nicely! That ornamentation at the bottom takes the form of two opposing 18th century "Fleuron" border pieces. I like these pieces because they played a prominent role adorning the work of the German Printers of Pennsylvania, the likes of Kristof (Christopher) Sauer, and the boys at the Ephrata Monastery, John Fass and Hammer Creek Press, &c.
The text stays pretty well true to it's 18th century hand-set lineage, incorporating Caslon throughout. The titling seen above is Caslon Open Face, cast by the American Type Founders around 1910. This font was donated by the Orlando Sentinel Star's Daytona Office, along with a set of locally made Masonite type trays that in our climate down here in the Deep South, outlived their hardwood Hamilton counterparts. Masonite contains an oil that suppresses vermin activity. Termites, particularly. Caslon Open Face is by far my favourite titling font. I might note that my metal type comes from two sources, both of which have supplied Colonial Williamsburg and back when there was such a thing, the Smithsonian Institution's Hall of Printing, where I attended at least one workshop on their Clymer's Columbian Iron Press, back in the early eighties. It was from the Hall that the Smithsonian's' "Stuffed Goose Packets" were released, containing a series of authentic broadsides, Indentures, and 17th Century selections of Moxon's Mechanick Exercises (1683)
The finishing touch: Fleuron border pieces. These pieces came from Bill Riess at the Quaker City Type Foundry, Honeybrook Pennsylvania, and date from the 18th century, design wise. I love the Pennsylvania connection. Not only were some of the American Colonies most illustrious printers plying their trade there, and not only did major activity during the Revolutionary War take place there, which was very much still in the air, the warp and woof of the Delaware Valley culture when I lived in Devon, but also where I received my first formal training in "Printing", via a course set forth in the Tredyffryn Township area High Schools by the Norther Chester County Technical School, which was a trade course. Nowadays we would call it "Letterpress Training", but in 1969 it was Trade Printing in it's purest form, as taught from the Print Shop at Conestoga High School. Even though I live in the deep South, and imbibe the proud traditions of the old Southern "way", I will always consider myself a Printer, Late of Philadelphia, and refer back to the Delaware Valley of my training years.
My next installment will be the imposing and printing of this Forme, which is what an assembled composition of hot metal type is called when locked into the press' iron chase. Then comes the printing. Until then, I must wait for the Paper and Dies to show up!
-gary.


